The Best Gluten-Free Sandwich Bread
Post may contain affiliate links. As an Amazon Associate I earn from qualifying purchases.
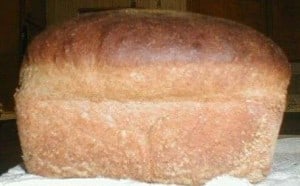
I did some more experimenting this past weekend making some gluten-free sandwich bread. I had been making the recipe that I included in my Gluten-Free Cookbook, but I really wanted to improve on the taste of the bread. Well…I found a different recipe online to try, did some tweaking, and I really like how it turned out! My daughter made a peanut butter and jelly sandwich with it and it was delicious! It does include some different kinds of flours. I bought some dried garbanzo beans at Walmart and ran them through my grain mill to make garbanzo bean flour. I also grind brown rice in my grain mill to make the brown rice flour. Grinding my own flours like this saves me some money. Buying the flours is more expensive. I had to buy the tapioca flour at the health food store because I couldn’t find any tapioca to grind :). Xanthan Gum you may have to buy at a health food store as well, but the rest of the ingredients can be found at your local grocery store. This bread turned out wonderful. It rose so nicely and made such soft bread. You are going to LOVE it! My next experiment is to use this recipe to make pizza crust. I’ll let you know how that goes! For now, enjoy this bread!

3/4 cup Chickpea flour (also called Garbanzo bean flour)
3/4 cup brown rice flour
1 cup cornstarch
1 cup + 1 Tablespoon tapioca flour
3 Tablespoons ground flaxseed
3 ½ teaspoons xanthan gum
1 ½ teaspoon salt
3 Tablespoons brown sugar
¼ teaspoon cream of tartar
2 ¼ teaspoons active dry yeast
3 Tablespoons olive oil
3 eggs
2 teaspoons apple cider vinegar
1 1/8 cup warm water
1. Combine all of the dry ingredients in a medium size bowl or your mixer bowl. Mix thoroughly on medium or low setting.
2. In a separate bowl, mix together the eggs, warm water, apple cider vinegar, and olive oil until all the ingredients are mixed.
3. Pour wet ingredients into the dry ingredients and mix with your mixer on medium speed (Use paddle or dough hook).
4. When sticky ball forms scrape sides to get all of the flours and ingredients mixed together and continue to mix for about 1 minute more. (You may need to add a bit more brown rice flour if the dough looks too wet. It will not look like gluten bread, though. It will be sticky, but should be a paste-like consistency, not runny.)
5. Scrape into a 9 x 5-inch lightly greased loaf pan and spread dough out with spatula. Cover with plastic wrap let rise in a warm place until at least double in size (approximately 45 to 60 minutes). I like to warm my oven, then turn it off and put the bread in the oven to raise.
6. Once bread has risen, remove the pan from the oven if you put it there to rise, and preheat the oven to 375 degrees.
7. When oven is preheated, remove plastic wrap and place pan in preheated oven. Bake for 35-40 minutes or until the loaf sounds hollow when tapped with a spoon. Remove from pan and cool on a wire rack. Allow it to cool completely before slicing.
8. If you do not plan on eating the bread within 24 hours, slice it up and put it in freezer containers in the freezer. Then simply take out the slices you want to use and thaw them out to eat.
__________________
If you would like more recipes like this, check out our Gluten-Free Cookbook for Beginners here!
This recipe has been linked up at the Gluten-Free Recipes Parade over at Heavenly Homemakers!


16 Comments